The currently new Intel NUCs are great hardware, but they need some special treatment for them to work with ubuntu und KODi. So here’s my experience and what steps I had to take to make this functional.
Hardware
- Intel NUC5i5RYH
- 64GB SanDisk Solid State Disk 2.5″ (6.4cm) SATA 6Gb/s MLC asynchron
- 2 * 2GB Crucial ValueRAM DDR3-1600 SO-DIMM CL11 Single
Update BIOS
This is fairly important, make sure that you update your BIOS first. I tried to install the newest version which was available from the Intel website, but I got an error, stating that the choosen BIOS cannot be installed. So I first upgraded to the previous versions step by step, until I reached the newest BIOS. Prior to 0247, the IR receiver won’t work, so updating the BIOS is fairly necessary to get a HTPC to work.
Initial Install with Ubuntu 15.04
You won’t have any luck with Ubuntu 14.04 or 14.10, as the graphic drivers in the installer don’t work with the HD6000 from the broadwell processor. So download at least Ubuntu 15.04 as an ISO-Image and store it to your disk.
Download the Universal USB Installer, choose the previously downloaded image and create a bootable USB-Stick. Afterwards, plug it into your Intel NUC and give it power. Be sure to have a keyboard, mouse, Network and HDMI/DisplayPort-Display attached to your device. Hit „F10“ and choose the USB-stick.
Choose „Install Ubuntu“ and use all default values that are presented to you except for the login – make sure that this is automatic and that you don’t have to enter a password. Of course, you can change your username. At the end, your NUC is rebooted, be sure to remove your USB-stick.
Things to do after the first boot of 15.04
There are some lists out there in the internet, but there are two things you should consider when using the NUC as a HTPC:
- Disable/Uninstall/Remove Amazon
- Disable the screen saver (and the „Lock“-Feature)
- Remove libsane (because it’s responsible for the crash if you get a „System program problem detected“ after login.
Remote Control
Ubuntu 15.04 is using rc_core, no longer lirc. Installing ir-keytable will make a new directory /etc/rc_keymaps:
sudo apt-get install ir-keytable
cd /etc/rc_keymaps
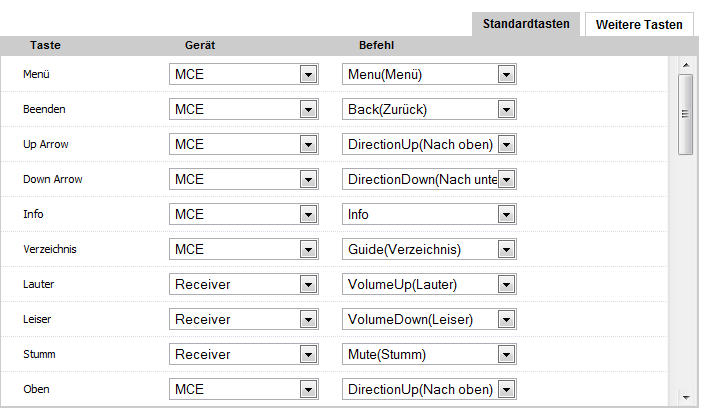
In my case, I use a Logitech Harmony One, which is configure to four devices:
- TV (for showing the content)
- Receiver (for Volume)
- Intel NUC (this is ONLY needed to turn it on and off)
- MCE (EVERY OTHER button should be mapped to this device)
It should look something like this. I guess you get the idea, even if some text is in german:
For your buttons from the remote to work, you must change some of the keys to the shortcuts from KODi. Create a new file /etc/rc_keymaps/rc-rc6-mce and put the following inside of it:
0x800f0400 KEY_0
0x800f0401 KEY_1
0x800f0402 KEY_2
0x800f0403 KEY_3
0x800f0404 KEY_4
0x800f0405 KEY_5
0x800f0406 KEY_6
0x800f0407 KEY_7
0x800f0408 KEY_8
0x800f0409 KEY_9
0x800f040a KEY_Q
0x800f040b KEY_ENTER
0x800f040c KEY_SLEEP
0x800f040d KEY_MEDIA
0x800f040e KEY_MUTE
0x800f040f KEY_I
0x800f0410 KEY_VOLUMEUP
0x800f0411 KEY_VOLUMEDOWN
0x800f0412 KEY_CHANNELUP
0x800f0413 KEY_CHANNELDOWN
0x800f0414 KEY_F
0x800f0415 KEY_R
0x800f0416 KEY_P
0x800f0417 KEY_RECORD
0x800f0418 KEY_SPACE
0x800f0419 KEY_X
0x800f041a KEY_DOT
0x800f041b KEY_COMMA
0x800f041c KEY_NUMERIC_POUND
0x800f041d KEY_NUMERIC_STAR
0x800f041e KEY_UP
0x800f041f KEY_DOWN
0x800f0420 KEY_LEFT
0x800f0421 KEY_RIGHT
0x800f0422 KEY_ENTER
0x800f0423 KEY_BACKSPACE
0x800f0424 KEY_ESC
0x800f0425 KEY_TUNER
0x800f0426 KEY_C
0x800f0427 KEY_ZOOM
0x800f0432 KEY_MODE
0x800f0433 KEY_PRESENTATION
0x800f0434 KEY_EJECTCD
0x800f043a KEY_BRIGHTNESSUP
0x800f0446 KEY_TV
0x800f0447 KEY_AUDIO
0x800f0448 KEY_PVR
0x800f0449 KEY_CAMERA
0x800f044a KEY_VIDEO
0x800f044c KEY_LANGUAGE
0x800f044d KEY_TITLE
0x800f044e KEY_PRINT
0x800f0450 KEY_RADIO
0x800f045a KEY_SUBTITLE
0x800f045b KEY_Q
0x800f045c KEY_GREEN
0x800f045d KEY_YELLOW
0x800f045e KEY_TAB
0x800f0465 KEY_POWER2
0x800f046e KEY_PLAYPAUSE
0x800f046f KEY_PLAYER
0x800f0480 KEY_BRIGHTNESSDOWN
0x800f0481 KEY_SPACE
Afterwards, load these keycodes and test them:
root@nuc:/etc/rc_keymaps# ir-keytable -w rc-rc6-mce
Wrote 63 keycode(s) to driver
root@nuc:/etc/rc_keymaps# ir-keytable -t
Testing events. Please, press CTRL-C to abort.
Install KODi
Now this step is pretty straightforward:
sudo apt-get install software-properties-common
sudo add-apt-repository ppa:team-xbmc/ppa
sudo apt-get update
sudo apt-get install kodi
Autostarting KODi after boot
We’ll make sure that KODi is started no matter which user starts the desktop. We can achieve this by adding a file to /etc/xdg/autostart:
/etc/xdg/autostart/kodi.desktop:
[Desktop Entry]
Type=Application
Name=Kodi
Exec=/opt/kodi.sh
As sometimes kodi drops to desktop (i.e. crashes), we want to make sure that it’s automatically restarted. That’s why we create another file, /opt/kodi.sh:
/opt/kodi.sh:
#!/bin/bash
killall pulseaudio
while true
do
AE_SINK=ALSA /usr/bin/kodi --standalone
done
Make sure that this file is executable:
root@nuc:/opt# chmod a+x /opt/kodi.sh
Get rid of PULSEAUDIO
Pulseaudio did not work well with my receiver, so I chose to disable it. As the default login user (NOT root), execute this command:
nuc@nuc:~$ echo "autospawn = no" > $HOME/.config/pulse/client.conf
Configure KODi
Now that we have a working KODi (simply reboot to make sure that this is true), we have to change some settings for it to work properly with the Intel NUC.
- Language / Location / Keyboard (if necessary)
- Audio Device (HDMI)
- Change further settings in ~/.kodi/userdata/advancedsettings.xml (if you did this before and know what you’re doing)
